Hello!
I was browsing different patterns on the internet. I came across several wine bottle bag patterns. I thought those would be good for hostess gifts. We had just been invited to a Canada Day party. A light bulb went off in my head! I knew I had red scrap fabric and I had 1 maple leaf punch....I could make the wine gift bag resemble the Canadian Flag!
After I made the Canadian Bag, I knew that there was also a 4th of July Party later in the week. So, why not make an American one, too. Also, I thought I'd try to do a tutorial to share.
Canadian Wine Bag Supplies:
Muslin Scraps
Red Broadcloth Scraps
Some type of interfacing...I again used scraps
Maple Leaf Punch
Fusible Interfacing for the back of the Maple Leaf (scrap)
Fabric glue
Cut:
From Muslin cut:
4 pieces 16"x 7" these will be the front/back outside and inside lining pieces.
1 piece 3"x 12 1/2" for the handle
1 piece 3"x4" this is the little loop that the strap threads through.
From red broadcloth cut:
2 pieces 7"x 7"
2 pieces 5 1/2"x 7"
 |
| Front and back and lining front and back pieces cut. |
I used a 1/2" seam allowance to sew the bag together. This seam allowance is included in the measurements above.
On all the red broadcloth pieces turn under 1/2" on one 7" side and press. Then pin these to the front and back pieces.
 |
| Pressed edges pinned to front and back pieces. |
(note: don't forget--like I did--to line these up so that they will be even on the side when you sew the front and back pieces together. You can do this by placing the front and back pieces side by side and checking that the lines are even.)
Then top stitch the red fabric close to the pressed edges.
Prepare the Maple Leaf:
I punched the Maple Leaf shape by punching it out of scrap paper. I used this punched shape as a template. I then took a scrap of red broadcloth and fused interfacing to the back of this scrap. I traced the Maple Leaf and then cut it out...using very sharp scissors.
I added the Maple Leaf by gluing it on with fabric glue however, if you feel so inclined you could applique it on. For the placement of the Maple Leaf on the front of the bag, I matched the bottom edge to the top edge and finger pressed. Then I matched the side edges and finger pressed again. This found my center point on the front of the bag to place the leaf.
Prepare the strap and loop pieces:
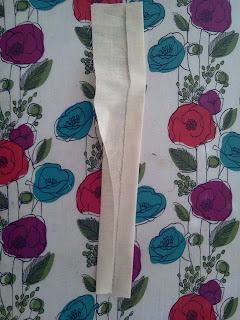
Fold the strap piece in half wrong sides together and matching the long side edges Press. Open this up then fold each side raw edge in to this creased line.
Then fold the piece in half and press again. Then edge stitch along both long edges.
Repeat this process for the loop piece as well.
Attach the loop piece to the front of the bag by finding the center top (the top will have the shorter--5" (1/2 turned under) by 7"--red piece of fabric sewn to it.) Attach each loop raw edge on each side of the center point.
 |
| pinned loop and strap |
For the strap match each raw edge and pin it to the top center of the back piece. Baste these pieces in place.
Prepare Bag:
Next mark and cut a 1 1/2" square from each bottom corner of the front and back pieces.
Pin the front and back pieces together. Sew down each side to the cut square. Then sew across the bottom...do not sew the square at this point. Only the sides then the bottom.
Make a box bottom by matching the bottom seam with the side seam and sew the bottom closed. (this will close the square cut out earlier). Repeat for other side.
Bag Lining:
Repeat the steps on prepare the bag for the lining front and back pieces but first apply interfacing by either fusing it or sewing it to the lining front/back pieces. On the lining only leave a 4"-5" opening on one side to turn the bag right side out--later.
Sew the outside to the lining:
Turn the outside bag right side out. The lining bag wrong side out. Place the lining bag over the outside bag and match top raw edges (place right sides together). Make sure that the loop and strap pieces are tucked into the bag.
Pin and sew along the top edge.
Turn right side out through the opening in the lining. Tuck the lining into the bag. Stitch the turning opening closed. Then edge stitch across the top of the bag.
 |
| inside with wine bottle |
Congrats! You're done!


No comments:
Post a Comment