Showing posts with label Bag Of The Month Club. Show all posts

Thursday, June 26, 2014

Updated City Slicker Bag

I wasn't happy with the front pocket flap on the original Ruffled City Slicker Bag I made. HERE is the original post.  So I made a few changes.  
I removed the original ruffled front flap.  I didn't like how the ruffles on that flap turned out.  I had to 're-open the turning opening then very carefully sew the new flap on.  
Again, I used the Bow Pattern from Michelle Patterns.  

Ruched Bye Bye Love Bag

Here is another version of the Bye Bye Love Bag. The pattern is designed by Sara at Sew Sweetness.   Here is the other bag I made.  I decided to try something I haven't done before.  I ruched  the fabric.  I guessed on how to do this technique.  I love how it turned out! 

 
Bag Front

Back of bag with zippered pocket
 

I added a rectangle of cross stitch mesh to the base of the bag to make it a little more stable.  I used auto upholstery foam as my interfacing.  I think the size of the bag and the extra sewing (ruching, pockets, flaps) made it a little more floppy.
I, again, added bows from the Bows Pattern by Michelle Patterns.  I can't get enough of these cute bows! 
I was browsing on Pintrest and came across this great idea to print on fabric.  You basically print out your design on wax paper from your printer.  Then iron and then burnish this on your fabric.  Well, it only sort of worked.  I added a text image of a French address on one of the pockets. It is clearer in real life. 
Inside of the bag.  With 4 large slip pockets.


Sunday, June 15, 2014

Ruffled City Slicker Bag

Here is another City Slicker Bag.  The pattern is designed by Chris W. Designs. 
Shortly after finishing the last City Slicker Bag I wanted to sew ruffles.  So, I did.  I figured, why not make the City Slicker Bag.  Oh!  All right! Everything was still sitting out, and I started to play. 

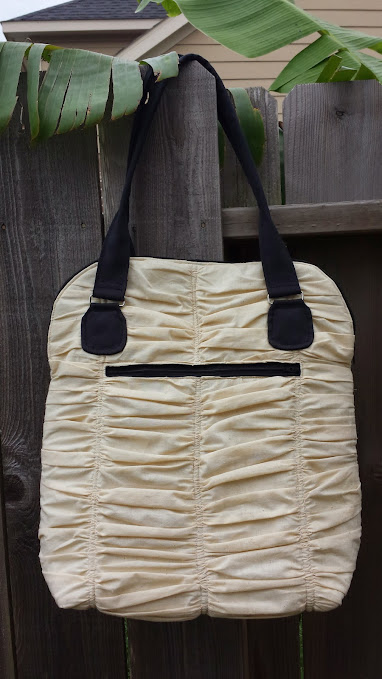
Here is the front of the bag.  I added the ruffles to the sides of the bag and I used lace on the front and back panels.   I updated this front.  See this post.
I will include a very rough tutorial on how I added the ruffles on this bag.  So, bear with me.  :)
On the front pocket, I trimmed 3/8" from the outside of the front pocket flap.  I then should have taken a strip of fabric that was 1 1/2" wide by double the length of the outside edge of the flap.  I say should have as my fabric was a little bit wider and I'm not exactly happy with it.  Anywho, place wrong sides together matching the long edge and press.  Then run a basting stitch close to the raw edge.  Pull the bobbin thread and ruffle the strip of fabric.  Pin ruffle around front flap piece starting and stopping 3/8" from the top on each end.  Sew 1/8" from raw edge.    Finish front flap as directed. 
 
Here is the back of the bag.  I think I'm now addicted to welt pockets.  :)


To add ruffles to the side pieces, I cut several strips of fabric that were 4 1/2" wide.  The fabric I used is 54" wide.  I **think** I cut (6)  4 1/2" wide strips--yep, I am suffering from a case of CRS.   Take two strips, match short ends and sew together using a 1/4" seam allowance.  Press this seam open.  Add another strip to the other end.  Continue this process until all strips are sewn together.  Then place the long strip right sides together matching long raw edge.  Sew all along the long raw edge using a 1/4" seam allowance.  Turn this right side out and press.  Run a long basting stitch close to the top long edge you sewed together previously.  If you feel the need you could run two basting stitches slightly apart.  I didn't.   You will pull the bobbin thread(s) to make the ruffles in a little bit.   
Now, take one side panel. From the top curved edge, measure and mark a line that is 1 1/2" away from the top edge.  Note: your line will be curved.  Continue marking curved lines 1 1/2" from previous line all the way to the bottom.  Note: there will be less than 1 1/2" from bottom line to bottom of the side panel. 
Take your long strip of fabric and roughly measure along the bottom drawn line on the side panel piece.  Mark this length (I just held it with my thumb) then double this length and cut.  Pull the bobbin thread and ruffle up your strip of fabric so that it is somewhat even.  Pin this piece along the bottom curved line.  Even out ruffles if needed.  Then sew into place along the curved line.  Since there is a lot of fabric hanging down I went ahead and basted the fabric strip in place from the  bottom line, to the bottom corner, along the bottom to the other corner, then up to the line.  I then cut the fabric to match the panel piece.  Continue adding ruffle pieces to all the lines as described above with one exception.  I waited until all ruffle lines were attached before basting along both sides of the side panel piece and trimming the ruffles to match the side panel piece. 
Whew!  I hope that was somewhat clear.  Please ask if you have any questions.   
 
The denim accent fabric I used is from my son's out grown jeans.  I guess the upside of having a still growing 6'2" young man is that I have lots of outgrown denim around.  Although, I have to admit it is just not right that I have to look up to talk to him.  


Enjoy your day! 

Thursday, June 12, 2014

The City Slicker by Chris W. Designs

Meet Ms. June from the Bag of the Month Club.  I can't believe that this is the last month!  I'm sad!  When the first of the month rolls around, in a few weeks, (sniff, sniff) there will be no "little bit of happiness" in my e-mail. 
This is the advanced version of the City Slicker Bag designed by Chris W. Designs.  It is the first time I've used a pattern from Chris W. Designs.  WOW!  What a great pattern!  There are so many details to the pattern.  If you don't want all the pictures....NO PROBLEM just go with the included text only version of the pattern.  If you are like me and sometimes would rather measure and cut your square or rectangle pieces instead of using a pattern piece...those dimensions are given, too. 
This is the front of the bag.  The brown and raspberry fabric are fabric I've had around for a while.  I've also had the print fabric, which is Blush by Basic Grey, several years.  I've been a HUGE Basic Grey fan from my paper crafting days. 
I wanted to use a darker color for the handles.  After I finished the outside of the bag, I thought it need another touch of the printed fabric for balance.  So, I added a sash that I tied into a bow. 
Here is the back of the bag. It  was my first time making a welt pocket.  The instructions on the pattern are clear.  I, however, decided to search for a video. I was having a mental block.  This is the video I watched.    I'd bought an online class to learn how to make welt pockets several months ago.  Do you think I turned to this class for info.?  NOPE!  Oh!  I'll get to it!  Just another thing I need to add to my "To Do" list.   :)
Here is the beautiful inside of the bag.  I LOVE all the pockets!  SO GREAT! 
This is also the first time that I've used something similar to  the By Annie's Soft and Stable.  I believe that's the name.   I have not been able to find the By Annie's foam.  I did finally find some auto headliner foam.  WOW!  What a difference!  Normally, I'd use really stiff interfacing that is NEVER easy to sew.  Especially on this bag!  I know my fingers would have been black and blue and scabbed over right now...maybe even invented a few new words.  I also  have to talk nice to my machine to get it to sew through all those thick heavy layers.   It was a dream to sew with this auto headliner foam! 
I LOVED having the "Bag of the Month Club."  I hope there will be another one sometime in the future.  Thank you to everyone that created the club and put it all together and to all the amazing designers that participated!  Through this club, I learned about some fabulous new (to me) bag designers.  I learned several new techniques, as well.  Thank you!
Until next time....

Sunday, May 11, 2014

Poolside Tote--Noodlehead

Happy Mother's Day!  I just added the final touches on this bag this afternoon.  It's always a good day when I have the opportunity to sew. 
This is May's Bag of The Month Club Bag.  It is the Poolside Tote designed by Noodlehead.  This is a great roomy bag!  I love the shape and style of this bag, too. 
The bows are not included in this pattern.  I decided to embellish the bag a little bit.  They are made with the Bows Pattern from Michelle Patterns.  These bows are ADORABLE!  There are two sizes of bows included in the pattern. 
All of the fabric that I used is from IKEA.  I can not get enough of fabric with text.  As soon as I saw this Poolside Tote Pattern, I knew I had to make a trip to IKEA to buy this fabric.  I had been hoping for a reason.  :) 
The Poolside Tote pattern includes a couple of different options for outside pockets.  I made the zipper pocket.   
I decided to play around a little bit when I was putting the lining together.  I wanted to see if I could make a zippered divided pocket.  IT WORKED!!!!   
 

Tuesday, April 8, 2014

Midtown Messenger Bag

This is the Midtown Messenger Bag from Betz White.  It is April's Bag of the Month Club Bag. 
 
Midtown Messenger Bag-front
Lately, I have been making bags for others out of outgrown clothing they provide me.   So, I decided to make a bag from some of my children's outgrown clothing.  This bag was made from a pair of my son's cargo shorts, a pair of jeans, painter's cloth, and scrap fabric. 
  Since I deiced to use a pocket from the shorts on the front of the flap, I changed the pattern slightly here.  Instead of cutting the flap strip, flap center panel and flap side panel, I used the flap lining panel to cut the top of the flap piece.  The pocket on the flap is useable.
I love the look of the Tuck Catch Closures, but I had a hard time finding them.  There wasn't much of a selection online, either.  I finally had an "Aaaah Haaa! Moment."  I searched for and found the closest leather specialty store.  That is where I got the ones I used.   They were less expensive than the ones I found online, too. 
Midtown Messenger Bag-Front of bag under flap
 
Under the flap there is a divided slip pocket on the front.  I've left the pockets (from the shorts) useable.  Whew!  It was not easy to cut these pieces.   
Midtown Messenger Bag-Zipper top
This is a picture of the inside of the bag.  You can see the tablet pocket.  This pocket closes with a Velcro square.   
This is the back of the bag.  There is another slip pocket here.  As you can see, this is the top front of the shorts. 
I've tried on several occasions to make a "m-urse"  (A.K.A-a bag for a man).  :)   The men in my family  always tell me that the "m-urses" I make are too "girlie."   I thought "Oh ya!  I've got it now!  If I use my son's clothing, then it for sure will be 'manly.'"  So, what did they say when I showed them this bag?..."It looks girlie."  Whatever!  :)
 
So, what do you think?  Is this a "girlie" bag? 

Tuesday, March 18, 2014

Convertable Bag Pattern--By Mrs. H.

Hello everyone!  This fun very useful bag is March's pattern from Bag of The Month Club.   Have I mentioned how much I LOVE this Bag of the Month Club!  Best present to myself EVER!  This Convertible Bag Pattern is from Patterns by Mrs. H. 
Convertible? You may be asking yourself?  YES!  This bag can be carried three ways!  On the shoulder, cross body or as a backpack!  LOVE IT!
So, once again, I was playing around.  I added the bow on the flap.  I wasn't so sure I liked the bow--after I was done.  So I tried the flower on the bow.  Well, I think I like the flower a little better--check with me a little later...I might change my mind.  HAAAAA!
This is the front of the bag with the flap open.  It has a nice big pocket on the front.  The pattern calls for a "thumb catch" closure.  When searching online I also found them to be called "Tuck Lock Clasps."  Instead, I used a twist lock closure.  Since I changed the closure I also had to change the way I put it together.  I sewed around the sides and bottom of the front pocket right sides together.  Leaving the top edge unstitched.  I then pressed the seam allowance along the top edge then clipped the corners and around curves then turned right side out--tucking in the top edge.  I then pressed this really well.  I placed and pinned the pocket on the bag according to directions.  Then I decided where on the flap I wanted to place the twist lock opening.  I attached that part on the flap.  I then roughly figured out where on the front pocket I'd need to place the lock part of the twist lock.  On mine I figured about 1" higher than the pattern.  Mine was about 2 1/2" from the bottom of the front pocket.   I marked the prong placement.  I then marked on the front of the bag where my pocket was placed, removed it, and carefully cut through ONLY the top layer of the front pocket.  NOT the lining.  I then added my interfacing square, my fray check,  and the lock and washer part of the twist lock.  Then I edge stitched along the top edge.  I placed it back on the bag front and continued as per the instructions. 
This is the inside of the bag.  There is a nice divided slip pocket on one side and a zippered pocket on the other side.   
This is the back of the bag.  There is also a nice zippered pocket on the back!  SQUEE!  :)   You can tell that the strap is attached at the sides--for the shoulder and or cross body options. 
Here is the bag with the straps to make a backpack  The other slight change I made was since my strap hardware was slightly wider than the instructions, I also had to adjust the back tunnel piece to accommodate the wider strap. 
That's all for now!
 
ENJOY!


Thursday, February 13, 2014

Butterfly Sling Purse

This is the Butterfly Sling Purse.  It is February's Bag of the Month Club Pattern designed by Janelle Mackay from Emmaline Bags


Oh, how I am in LOVE with this bag!  I finished it just in time for Valentine's Day, too!  Fitting?  Hummmm?  :) 
 Speaking of weather!  Wait, I wasn't talking about the weather....well, I am now.  What a difference a day makes!  Today was BEAUTIFUL!  There was SUN and warmer temps--without being too warm.  Love these kind of days!  :)
Top View--see those card slot pockets!
I also love when bags have lots of pockets. Oh, the organization of it all!!!  (Swoon!)
Sure, I don't always like that I own a zillion zippers and not one is the right color EVER!  Nor do I always like to cut all those extra pieces of fabric and interfacing.  Wowzers!  I love me some pockets! :) 
This bag has a total of 12 card slots (6 on each side), 3 zippered pockets, a slip pocket--perfect for my phone, an ID pocket.
Opened Up


Other things I love about this bag:  it has an adjustable cross body strap, it is a great size--I can fit my phone, keys, sunglasses, ID and a few other items--no problem!
Back
 
This bag goes together pretty easily.  For some unknown reason I thought I'd struggle more making it. 
Have a GREAT day!

Tuesday, February 11, 2014

Bye Bye Love Bag

Hello Everyone!  I know I've been missing.  I have several blog posts in various stages of being done.  I've been busy sewing, sewing, sewing!  Whoo Hoo!  As a result, I haven't taken much time to write blog posts. 
I was outside taking pictures today and it was actually too cold to be standing out there.  I am SHOCKED as it's not normally this cold where I live.  This winter has been interesting to say the least.  My kids have even had snow days this year.
Sara from Sew Sweetness designed this wonderful Bye Bye Love Bag. It's from the Bag of the Month Club.  I bought a membership as a gift to myself.  :)  I am so glad I did!  
Bye-Bye Love Bag front with flower
Bye-Bye Love Bag front without flower
I decided to play around a little bit.  I added that purple panel on the top front of the bag.  I could have added it to the back of the bag, but as you see below I decided not to--at the last minute. 
The back with AWESOME zipper pocket. 

 
Inside
This is a LARGE flower!
I was in the mood to make a BIG flower.  So, I made a BIG flower!  LOL!  I added a pin on the back to that it can be removed or moved.  What do you think with flower or without?
I actually just finished this bag last night and made the flower today.  I can't wait to get started on February's Bag of the Month Bag!  I LOVE this bag, too!