Showing posts with label Tutorials. Show all posts

Monday, July 1, 2013

Wine Bottle Gift Bag Tutorial

Hello! 
I was browsing different patterns on the internet.  I came across several wine bottle bag patterns.  I thought those would be good for hostess gifts.  We had just been invited to a Canada Day party.  A light bulb went off in my head!  I knew I had red scrap fabric and I had 1 maple leaf punch....I could make the wine gift bag resemble the Canadian Flag! 
After I made the Canadian Bag, I knew that there was also a 4th of July Party later in the week.  So, why not make an American one, too.  Also, I thought I'd try to do a tutorial to share. 


Canadian Wine Bag Supplies:
Muslin Scraps
Red Broadcloth Scraps
Some type of interfacing...I again used scraps
Maple Leaf Punch
Fusible Interfacing for the back of the Maple Leaf (scrap)
Fabric glue
 
Cut:
From Muslin cut:
 4 pieces 16"x 7" these will be the front/back outside and inside lining pieces.
1 piece 3"x 12 1/2" for the handle
1 piece 3"x4" this is the little loop that the strap threads through. 
From red broadcloth cut:
2 pieces 7"x 7"
2 pieces  5 1/2"x 7"
 
Front and back and lining front and back pieces cut. 
 
I used a 1/2" seam allowance to sew the bag together.  This seam allowance is included in the measurements above.   
On all the red broadcloth pieces turn under 1/2" on one 7" side and press.  Then pin these to the front and back pieces. 
Pressed edges pinned to front and back pieces.


(note: don't forget--like I did--to line these up so that they will be even on the side when you sew the front and back pieces together. You can do this by placing the front and back pieces side by side and checking that the lines are even.) 
Then top stitch the red fabric close to the pressed edges. 
 
Prepare the Maple Leaf:
 
I punched the Maple Leaf shape by punching it out of scrap paper.  I used this punched shape as a template.  I then took a scrap of red broadcloth and fused interfacing to the back of this scrap.  I traced the Maple Leaf and then cut it out...using very sharp scissors. 
 
I added the Maple Leaf by gluing it on with fabric glue however, if you feel so inclined you could applique it on.  For the placement of the Maple Leaf on the front of the bag, I matched the bottom edge to the top edge and finger pressed.  Then I matched the side edges and finger pressed again.  This found my center point on the front of the bag to place the leaf. 
 
Prepare the strap and loop pieces:
 
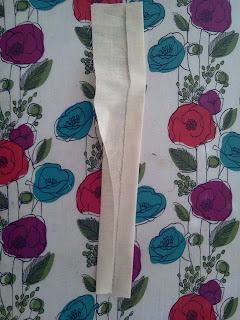
Fold the strap piece in half wrong sides together and matching the long side edges Press.  Open this up then fold each side raw edge in to this creased line. 
 
Then fold the piece in half and press again.  Then edge stitch along both long edges.
Repeat this process for the loop piece as well. 
 
Attach the loop piece to the front of the bag by finding the center top (the top will have the shorter--5" (1/2 turned under) by 7"--red piece of fabric sewn to it.)  Attach each loop raw edge on each side of the center point. 
pinned loop and strap
For the strap match each raw edge and pin it to the top center of the back piece.  Baste these pieces in place. 
 
Prepare Bag:
 
Next mark and cut a 1 1/2" square from each bottom corner of the front and back pieces. 
 Pin the front and back pieces together.  Sew down each side to the cut square.  Then sew across the bottom...do not sew the square at this point.  Only the sides then the bottom. 
Make a box bottom by matching the bottom seam with the side seam and sew the bottom closed.  (this will close the square cut out earlier).  Repeat for other side. 
Bag Lining:
Repeat the steps on prepare the bag for the lining front and back pieces but first apply interfacing by either fusing it or sewing it to the lining front/back pieces.  On the lining only leave a 4"-5" opening on one side to turn the bag right side out--later. 
 
Sew the outside to the lining:
Turn the outside bag right side out.  The lining bag wrong side out.  Place the lining bag over the outside bag and match top raw edges (place right sides together).  Make sure that the loop and strap pieces are tucked into the bag. 
Pin and sew along the top edge. 


Turn right side out through the opening in the lining. Tuck the lining into the bag. Stitch the turning opening closed. Then edge stitch across the top of the bag. 
 

inside with wine bottle


Congrats!  You're done!


Friday, November 30, 2012

Bobble Blanket

Sorry, it appears I took most of the month of November off.  I have been busy, and neglected the blog. 
Here is a blanket I finished last spring. If you make one please share.  Thanks!
Ever since I saw this post.  I wanted needed to make a bobble stitch blanket.  She even gives a quick bobble stitch tutorial here

If I would have paid attention to this tutorial the sides of my blanket might have been more even...but I bet you didn't really notice, huh?  :)

I kind of made an educated guess using info. from the Tales From the Cuckoo Land Blog to make this blanket.
The size of mine turned out to be about 65" wide by 70" long
I used Lyon Brand Yarn Pound of Love 2 skeins of bubble gum, 2 skeins of light pink and black...stash. 
Here is the pattern I used: disclaimer....this is my first time trying to explain crocheting. I am still somewhat of a beginner.  Please be nice.  Please note this is how I made this blanket...my bobbles are not even...down one side I have an extra stitch when compared to the other side.  If this bothers you please make adjustments. 
For the bobble stitch I used: (*yo, insert hook in desired st, pull up one loop, yo, pull through 2 loops, repeat from * 4 times (there will be 5 loops on your hook), yo, pull through all 5 loops. sc in next st.

In color A:
Row 1:  168 Foundation Single Crochet's
Row 2: Ch 1, sc in each st across (168 single crochet's)
Row 3:  Ch 1, sc in each st across (168)
Row 4:  Ch 1, *7 sc, bobble stitch in nxt stitch, repeat  from * till end of row (note: at the end of the row I did 8 sc instead of 7 sc and then bobble stitch) (168)
Rows 5-7: Ch 1, sc in each stitch across (168)
Row 8:  Ch 1, 4 sc, bobble stitch in nxt st, *7 sc, bobble stitch in nxt st, repeat from * to end of row (again note: my bobbles are not perfectly off set....two rows of bobbles are closer together. At the end of the row I had 3 sc)
Rows: 9-11 repeat rows 5-7
Row 12:  repeat row 4
Rows 13-15 repeat rows 5-7
Row 16: repeat row 8
I continued this pattern until I had a total of 20 bobble rows.  I finished that section with 3 rows of single crochet
Switch to color C (black-color c) and did 3 sc rows. 
Switch to color B (lt pink-color b) and did 3 rows of sc, then bobble row (continuing pattern above) until I had 16 bobble rows, then finished with 3 sc rows,
Switch to black, did 3 rows of sc,
Switch back to dark pink (color A) start w/ 3 rows of sc...then crochet a total of 12 bobble rows (following pattern above) finish with 3 rows sc
Switch to Black 3 rows sc
Switch to lt pink (color b) 3 rows of sc, then 8 bobble rows (following pattern above), finishing with 3 rows of sc. 
I edged my blanket using the three colors in my blanket.
Let me know your thoughts and if you have any questions

ENJOY!

Friday, September 14, 2012

Mummy Bag

Hello again! 
I had fun playing, again.  Like the bag I made yesterday, I made this for the Hambo Hoedown Challenge. 
For this bag I used "Mummy" digital image from Hambo Stamps.  I colored it in on the computer and printed it on a t-shirt transfer.  I ironed the transfer  to a torn rectangle of muslin. 


Here is my little tutorial on how I made this bag.  I used muslin.
Seam Allowance is 1/4"
Cut two pieces 24" long by 14" wide. 
Cut two pieces 18" long by 4" wide for handles.
Tear several strips of fabric. 

To make the lining:
1.  Fold one 24"x14" piece of fabric in half matching the 14" sides.  Your fabric will be 12"x14".  Press a crease on the fold. 
2.  Along the bottom fold and the edge measure and mark a 1 1/2" square on each side.  Cut this square out. 
3.  Then sew along the edge from the top of the bag to the square you cut out.  Do this on the other side.  Press the seams open. 
4.  Match the side seam with the bottom crease and sew the edge closed.  (this will be the side width of the bag).  Repeat on other side. 
Set the lining aside. 

For the front of the bag follow steps 1 and 2. 
Then randomly sew the torn strips of fabric to the front of the bag.  I used a zig zag stitch to attach them.  I only sewed the strips to the front of the bag (stopping at roughly the top of the cut out square--aka the bag bottom edge)  but you could sew the strips to your entire 24"x12" piece of fabric. 

For the Handles, fold and press each 18"x 4" strips of fabric in half so you have a 2" by 18" strip.  Fold in each long raw edge to the center crease.  Then fold in half again.  You will now have a 1" by 18" strip.  Edge stitch along each long side.  I zig zag'ed a torn strip of fabric  down the center of each handle. 
On the front measure 5" in from each side edge  mark along the top of the bag.  Repeat on other side.  Then repeat for the back of the bag. 
Place handles with the side of the handle touching the 5" mark and stitch in place.  Repeat for other side of handle.  Then repeat for other handle.
Stitch the front/back together similar to lining (steps 3-4). 
Place the "Mummy" image rectangle aligning it with the lines created by the cut out square. 
Sew the outside and lining together by placing right sides together and stitching along the top edge. Make sure handles are tucked in out of the way.    Leave an opening for turning ( I left my opening between the handles on the back of the bag).  Turn the bag inside out and press along the top edge.  Then edge stitch along the top edge to finish the bag and to close opening.  On this bag I used a zig zag stitch again. 
Please share if you make a bag...leave a message.
Enjoy!

Friday, December 9, 2011

Hoedown #45-Here Comes Anta Claus!

HA!  This week's Hambo Stamps digi hits a little too close to home.  Ever since we moved into this house we've battled with ANTS!!!  It is a newer home and we didn't think would happen in a newer home.  So, this image with an ant carrying a present...well, I fear it could actually happen.  :)  I just never know at what part of the house or when I'm going to find a swarm of ants.  We spray and clean, then clean and spray,  then spray and clean some more, but they keep visiting us.  One of the worst swarms was the first night we were moving in the house.  I put a few items on the counter from the pantry...it was very late at night.  In the morning there were MILLIONS of ants swarming the counter.  There were several lines of ants several feet long coming from all directions.  UGGGGGGGGG! 
Anyway, we are about to move.  Not because of the ants...new job.  I'm not going to miss the ants. 

All righty then, I am actually going to try something new...a tutorial.  Nothing too fancy.  I was playing and thought I'd share...with pictures. 
First here is my entry into this week's Hambo Hoedown Challenge. 

This week's challenge is to use more than one fold on your card.  I made this gate fold card with a little bit of a twist. 

Are you ready? 
This is how I made this card.

Start with a 4"  by 12" piece of cardstock (CS) for the card base.

1)   Score this CS at 4" and at 8". 
2)  Then with a ruler and a pencil lightly draw a line at 2" and again at 10" (click on picture to make bigger). 
3)  Along the lightly drawn in lines (at 2" and 10") I  marked the center on those lines by measuring up 2" from the top (or bottom) and lightly marking a dot. 
4)  Next, with a 2" circle punch I punched a circle out of scrap paper. 
5)  Fold this punched circle in half.
6)  Place the folded circle flat side along the lightly penciled in lines (2" and 10") and aligning it with the top of the CS at the 2" line and (the bottom of the 10" side) and the center dot (step 3).  Lightly trace around the outside of the circle.  Don't forget to alternate one side on top the other on bottom. (see pic) 
7)  Cut out the half circle and the line on each side. 


8)  Then fold card at the scored lines.
9)  Decorate!  That's it!
Front


Inside
Supplies Used:
Stamps:  Hambo Stamps-AntaClaus-digi
Paper:  DCWV
Punches-2"circle punch, EK Success-1" circle punch
Other:  Martha Stewart Crafts-Score Board