Showing posts with label Charmed Liebling. Show all posts

Thursday, May 7, 2015

Working Girl Laptop Bag

 
Here is another Working Girl Laptop Bag.  The pattern was designed by Anna of Charmed Liebling.   The bag looks sleepy...hummm.  It's leaning because I didn't "stuff" the bag before taking the pic.  I was in a hurry because I needed to get this bag in the mail.    
If you look closely at the above picture, it is a picture of the bag flap.  Instead of using piping, I used my ruffle foot to add thin ruffle around the edges. 
Here is a link to another Working Girl Laptop Bag I made.   

Tuesday, May 5, 2015

Miss Miracle Bag

This is the Miss Miss Mabel bag pattern from Charmed Liebling.   Go to her blog to get info on where you can get this super cute bag pattern.
I love the retro style of this bag!  It's a very roomy bag, too.  
It has a zipper pocket on the bag back to keep keys, phone and or sunglasses handy.  

Monday, September 1, 2014

Summer Moves On Hobo Bag

This is the Summer Moves On Hobo Bag Pattern designed by Anna from Charmed Liebling.  This bag contains so many pockets!  Gotta LOVE all them pockets!  This bag has lots of room.  It also sits comfortably on your shoulder to carry.   
This is the front of the bag.  It not only has two great sized slip pockets, there are also two zip pockets on the front of the slip pickets!  Oh yaaaa!
This is the back of the bag.  It has two slip pockets.  
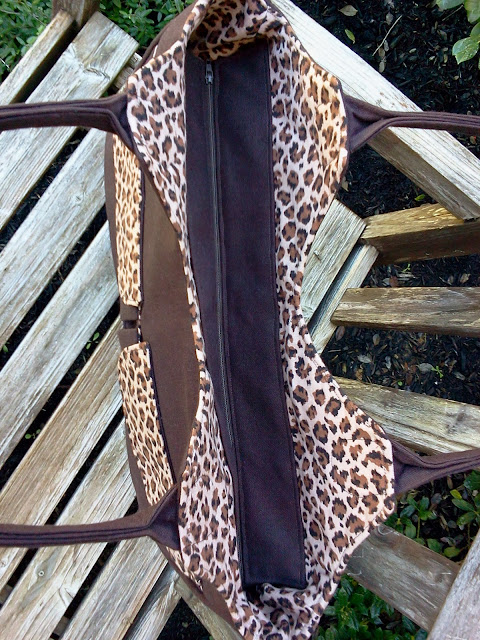
The view from the top of the bag.   
A view inside the bag. 
This bag would be great to use when traveling.  Especially, if you are like me and end up carrying everyone else's stuff.  It would also make a great diaper bag or a bag to take on a day of shopping with the girls or at a farmers market.     
Head on over to www.charmed-lieblig.com to grab this fun pattern. 


Thursday, July 17, 2014

Bag Accessories

Since I made myself the Lapin Noir Bag, I decided I wanted some new accessories to go with it.  Why not, right?
This is the All-Purpose Wallet from Charmed Liebling.  I've had a lot of fun with this great pattern.   
I added the ruffle down the center of the outside for fun. 
This is the inside of the wallet.  This has so many great components.  There is a zippered pocket, card slots, a dimensional cell phone pocket and a pocket for paper currency.   
That is a bow on top of my elastic cording on the cell phone pocket.  
On the sides of the credit card slots I pulled out my glue gun and glued down the twill ribbon.  I had the twill ribbon in my stash.  It has the definition of family printed on it.   This is actually from my scrapbook/card making supplies. 
Before I glued the ribbon, I zig zag stitched down the sides of the credit card slots a few times.  I also made sure to add glue to the sides of the slot pockets as well as the twill ribbon.
This sunglass case is from a pattern out of the book "Bags:  The Modern Classics" by Sue Kim.
The lighting is slightly different on this pic as I made and finished the wallet earlier in the day. Later, I decided I also wanted a new sunglass case.  
 That's all for now.  

Saturday, May 24, 2014

Pink Peony Bag by Charmed Liebling

I am very late to the game with this post.  Yikes! 
This is the Pink Peony Bag from Charmed Liebling.  It is available as a free pattern if you click on this link or go to the Sew Momma Sew Blog.
This is another super cute little bag pattern.  It is very quick and easy to sew. 
I LOVE the look of the pleats on the flap.  You can sew either a wrist strap, a shoulder/cross body strap or both.  I love when bags can be versatile like that. 
Since this project uses little pieces of fabric, I decided to use some of my children's outgrown clothing.   


This is the back of the bag.
I was in the mood for ruffles.  So, I added ruffles to the front and back of this bag. 


For this ruffle version I was able to use scraps for the inside and upcycle a pair of outgrown jeans. 
 

Monday, December 9, 2013

Rhine Valley Bag Pattern By Charmed Liebling

Sorry, I am so late in getting my pictures of this bag posted.  It's been one of THOSE months, you know? 
I was allowed the wonderful opportunity to test this bag for Anna at Charmed Liebling
 
I decided to go a little on the wild side with the fabric....looks similar to the pilgrim hat huh? :)  I got this fabric at a big discount.  A local store was going out of business and selling bolts of home décor fabric for next to nothing! 
 
The only slight change I made while making this bag was the handles.  I made these myself and added them a little differently than the instructions.  I attached the handles as one of the last steps.  After assembling the front/back and lining together. 
This is the view of the top of the bag....it has a zipper closure.  Zippers may scare away some, but the instructions are clear and easy to follow.  I like to have a zipper closure in the bags I use. 
This is the inside of the bag. There are two huge dimensional  pockets on one side of the inside of the bag. 
This is the back of the bag. 
 
This is such a great bag!  It is on the larger side.  I don't know about you but I like to take larger bags when I travel.  There just seems to be so much more that I need to stuff in my purse.    I love the flap pockets on the front and the zipper top closure.  The inside pockets are great, too!   
Go get this pattern and make yourself one of these great bags--Rhine Valley Bag Pattern from Charmed Liebling.

Tuesday, October 1, 2013

California Sunshine Bag Pattern From Charmed Liebling

Once again, I was allowed the amazing opportunity to test another great pattern for Anna at Charmed Liebling. This is the California Sunshine Bag. I can not begin to tell you how much fun I am having testing patterns. Although, I have learned a lesson that I need to print the pattern instructions.  Otherwise I forget to read parts of the instructions.  UGH!  When testing patterns, I've been trying to put my own creative twist on the project.  For this bag, I added bows. 
 
 
This is the front of the bag.  
 

This is the front of the bag with the flap up.  Again, I added the bows and the strip at the top of the pockets. 

 
This is the back of the bag.  There is a slip pock on the back.  Again, I added the bow and the strip at the top of the pocket. 

 
Besides the addition of the strips and the bows, the only slight adjustment I made was to the strap handle.  Since I had a 1.5" wide rectangle ring, I adjusted the strap and strap extenders to fit these. 
To add the strip at the top of the pockets:  I cut a piece of lining fabric 1 1/4" wide.  I pressed 1/4" of the long edge to the wrong side.  I then lined up the top raw edges of the pocket and the strip of fabric.  I edge stitched the fabric strip close to the fold. 
This bag is the perfect size...not too big and not too small.  There are lots of handy pockets that can be added.   If you are looking to make a new bag, I suggest heading here and getting yourself  this great pattern. 

Tuesday, September 10, 2013

Working Girl Laptop Bag from Charmed Liebling


Once again I was allowed the wonderful opportunity to test a pattern for Charmed Liebling.  This is a laptop bag. 


I chose to use a tweed like floral embossed fabric for the outside. 
Instead of using piping I cut strips of the lining fabric 2 1/4" wide.  I pressed it in half lengthwise and attached it with my ruffler foot. 


 I also changed the handle.  Since I had a 1 1/2" wide metal rectangle and a 1 1/2"adjustable slide.  I changed the length of my handle to a finished length of 1 1/2" wide by 60" long.  I also made the strap extenders wider to a width of 1 1/2". 
 
I love all the pockets in this bag and a nice space for the laptop.  There is also a hidden zipper pocket!  I LOVE IT! 
When I was out taking pictures of this bag, a neighbor stopped by and got a look at this bag.  She LOVED IT!  


Sunday, August 18, 2013

The All-Purpose Wallet Pattern from Charmed Liebling

 
Again, I was given the wonderful opportunity to test an awesome pattern. 
 
 
This is the front of the All-Purpose Wallet from Charmed Liebling.  I decided to play with my ruffle foot and add ruffles to the front of the wallet. 

 
Instead of using the phone pocket closure rectangle (in the pattern), I made and added a flower over the top of the elastic cord.  I also used an eyelet border along the side of the card slots instead of ribbon.  After attaching the card slot pieces per the instructions,  I zig zag stitched down each side of the card slots a few times.  Then I added the eyelet border.  Oh! One other slight change I made.  On the card slots I added 3/8" to the length so that I could fold to the wrong side two times to enclose the raw edge.   
This wallet includes lots of what I look for in a wallet: zippered coin pocket, card slots, bill slot AND a place for my cell phone.  LOVE IT!  My phone will fit in the pocket but only if I take it out of the protective case.  Next time I might try to add darts to the bottom of the phone pocket or add a little gusset around the side and bottom so my phone will fit. **UPDATE: When the pattern was released Anna from Charmed Liebling addressed the cell phone pocket.** 
The pattern includes a pattern piece for the main front and back.  The instructions are easy to understand and include lots of helpful pictures.   This is a new favorite pattern of mine.  I'm sure I'll have to make more.
To make this wallet I used all scraps.  The main front/back pieces and the zippered pocket lining are cut from muslin.  The chevron and French print used for the pockets and slots are scraps.  For the main front/back and phone pocket interfacing pieces, I used Pellon Decor Bond 809 on all pieces.  For all other interfacing pieces, I used a very lightweight fusible interfacing scrap.