Showing posts with label Patterns. Show all posts

Sunday, October 27, 2013

Vogue 8741 Bag


 This bag is made from Vogue Pattern #8741 by designer Marcy Tilton.  It is view C-D.


I made this bag out of faux leather or vinyl.  Although I like how the bag turned out, I do not recommend using this type of fabric for this particular bag.  It was a HUGE pain. 


This is a picture of the top of the bag.  It has a tie closure.  This is a huge bag with tons of pockets inside. 


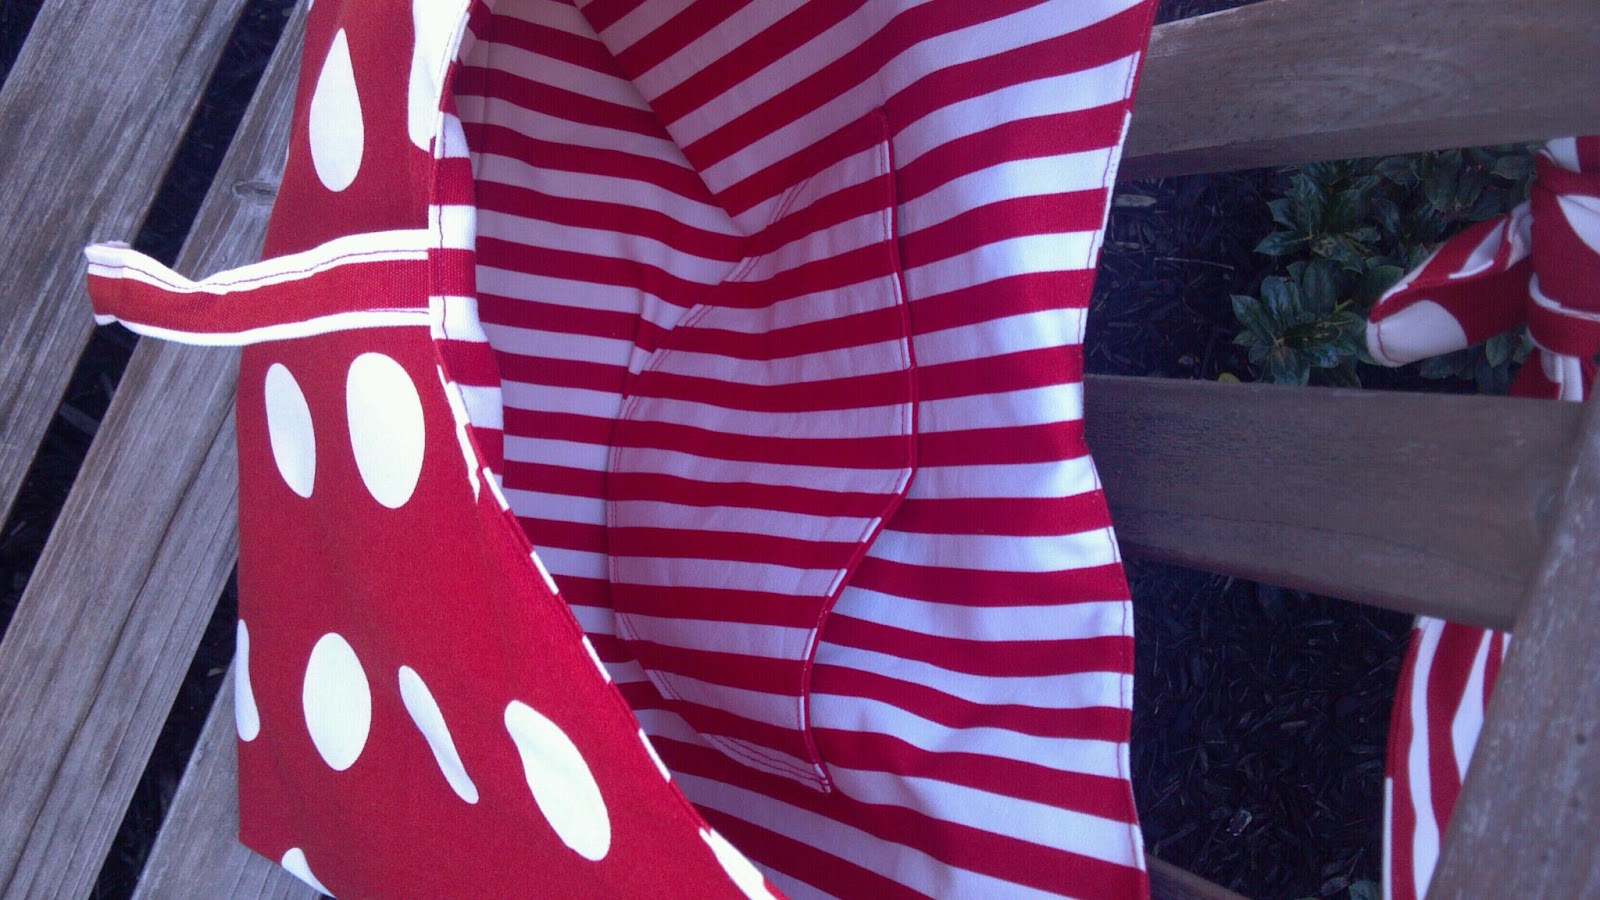
This is the inside of the bag.  There are 4 pockets along the outside (see dark grey with white dots).  These are four separate pockets...they are divided.  There is the pocket in the front, back, and each side. 
Before I sewed this bag, it was a little difficult to understand the pocket configuration. 
The roomy center inside area is the white with grey dots.  There is a zippered pocket in this section, too. 
 
I changed the handles.  I like a strap that can go over my shoulder.  The instructions have you cut a strap in half.  Then cut each half in half.  Since I wanted the strap to be longer I did not cut it in half the second time.  I knew my sewing machine would NOT forgive me if I tried to sew the straps on--again this is because I used faux leather.    Also, I knew the stitching would come undone easily.  So, I attached the handles using rivets.  I then added the covers from the pattern.   I wasn't happy with how the straps looked.  So, I thought on it for a little bit.  I then had an idea to make straps to tie around each  handle cover.   Now I LOVE this bag!  Although, if I were to make this bag again I'd still make the handles even longer. 
In my past experience with Vogue Patterns, there was usually a critical place where I couldn't understand what the instructions were tyring to say and I had a difficult time trying to figure out how to put it together.  That was NOT the case with this pattern.  The instructions were easy to understand.  The main confusing part was on the envelope back where the fabric requirements are...I had a difficult time figuring out the difference between view C and D.  Also, as stated earlier, the inside configuration wasn't very clear. 
 

Tuesday, October 1, 2013

California Sunshine Bag Pattern From Charmed Liebling

Once again, I was allowed the amazing opportunity to test another great pattern for Anna at Charmed Liebling. This is the California Sunshine Bag. I can not begin to tell you how much fun I am having testing patterns. Although, I have learned a lesson that I need to print the pattern instructions.  Otherwise I forget to read parts of the instructions.  UGH!  When testing patterns, I've been trying to put my own creative twist on the project.  For this bag, I added bows. 
 
 
This is the front of the bag.  
 

This is the front of the bag with the flap up.  Again, I added the bows and the strip at the top of the pockets. 

 
This is the back of the bag.  There is a slip pock on the back.  Again, I added the bow and the strip at the top of the pocket. 

 
Besides the addition of the strips and the bows, the only slight adjustment I made was to the strap handle.  Since I had a 1.5" wide rectangle ring, I adjusted the strap and strap extenders to fit these. 
To add the strip at the top of the pockets:  I cut a piece of lining fabric 1 1/4" wide.  I pressed 1/4" of the long edge to the wrong side.  I then lined up the top raw edges of the pocket and the strip of fabric.  I edge stitched the fabric strip close to the fold. 
This bag is the perfect size...not too big and not too small.  There are lots of handy pockets that can be added.   If you are looking to make a new bag, I suggest heading here and getting yourself  this great pattern. 

Monday, September 23, 2013

The Cargo Bag

This purse is the Cargo Bag from My Favorite Things Patterns. 
This is a really neat bag.  It is expandable.  There is a zipper that goes around the bag so that it can be expanded....see below.

 This bag has a two zippered pockets on the outside.  One has a zipper the other a flap closure. 
This was my first My Favorite Things Pattern.  The instructions were very clear and easy to understand.

Tuesday, September 10, 2013

Working Girl Laptop Bag from Charmed Liebling


Once again I was allowed the wonderful opportunity to test a pattern for Charmed Liebling.  This is a laptop bag. 


I chose to use a tweed like floral embossed fabric for the outside. 
Instead of using piping I cut strips of the lining fabric 2 1/4" wide.  I pressed it in half lengthwise and attached it with my ruffler foot. 


 I also changed the handle.  Since I had a 1 1/2" wide metal rectangle and a 1 1/2"adjustable slide.  I changed the length of my handle to a finished length of 1 1/2" wide by 60" long.  I also made the strap extenders wider to a width of 1 1/2". 
 
I love all the pockets in this bag and a nice space for the laptop.  There is also a hidden zipper pocket!  I LOVE IT! 
When I was out taking pictures of this bag, a neighbor stopped by and got a look at this bag.  She LOVED IT!  


Friday, September 6, 2013

Necessary Wallet-Cherry

I decided to make myself a Necessary Wallet Clutch with a strap for my summer travels.  It is perfect for when I don't want to lug the "mother ship" bag around.  :)    This time I made sure that I added the optional removable strap.  I also made the strap long enough that I can carry it across body. 
 
I have managed to use this for the past several months and I just love it!
One of the things I originally loved about this wallet is that there is space for a cell phone.  I have noticed that when this is full there isn't  very much room to put my cell phone in, too.
This is made from the Necessary Clutch Wallet Pattern from Emmaline Bags.   Check out the Emmaline Bags site!  She has some CUTE patterns....and more. 
Click here another version of this wallet that I made. 
 

Thursday, September 5, 2013

Coupon Wallet

Front
On occasion I will clip and use coupons.  So, I thought I needed to make myself a coupon wallet.  
 
I used McCall's pattern M6768.  For the most part this is a decent pattern.  
Below are a few issues and changes I will consider next time I make this coupon wallet: 
On step 9--attaching the card slot pocket--even though I knew what the instructions were getting at, I think maybe the illustration was for attaching the second slot pocket.  I had to reread this step a few times. 
I don't like how the raw edge at the bottom of the bill slots is left exposed.  Granted you only see this if you pull the bill slot pocket open and look.  Next time, I will  try tucking the raw edges in at the bottom of the slot pocket piece, press, then edge stitch this to the main piece. 
I attached the Velcro before basting the inside and front/back pieces together so that the stitching isn't visible on the opposite side...especially on the front flap. 
I sewed the dividers at the bottom.  Otherwise they are able to move waaaay out on either side--possibly dumping coupons.  
Okay--bad me!  I should have clipped the curves of the flap before hand sewing the binding.  But in my defense---I decided to hand sew this while on a car trip and I had forgotten my sharp scissors.  :)
 
Since I was using scraps, and directional fabric, one side had to be upside down....that is why the lady is on her head.  :)  However, you'll notice that the back is correct.  If I'd had more fabric to play with I would have tried to correct this. 
 
The flower is not part of the pattern.  It is just me playing with fabric....watchin' YouTube videos....
 
 
This is showing 6 card slot spaces.  There are 6 more at the front of the wallet, too.  There are also spaces on the back side of the card slots....maybe for receipts, or paper currency?
The inside...Here are the dividers and the zipper pocket. 
The back
  This is a neat wallet!  It is actually somewhat similar to the Necessary Wallet.   The Necessary wallet is constructed differently and has fewer dividers. 

Saturday, August 17, 2013

Peas and Corn Lunch Bag Pattern

 What a wonderful lunch bag pattern I was given the opportunity to test for Sew Sweetness.  It is the Peas and Corn Lunch and Snack Bag Pattern.  The pattern includes instructions for a rounded lunch box and a square lunch box AND a zippered snack bag. 
I love the shape of the rounded lunch bag.  I was in the mood to make this lunch bag.  So, I did.  :)
 
I decided to add a big bow on the front. 
 To make this bag I used a brown cotton canvas on the outside.  I used a lightweight interfacing (scrap) on the back of the brown canvas.  I also used the insulated fleece.  Since I used flannel backed plastic table cloth material for the inside, I did not use By Annie's Soft and Stable that the pattern suggests.
 

Saturday, August 3, 2013

Zip Around Wristlet Wallet

I came across this extremely cute wrist wallet.  It is called the Zip Around Wristlet Wallet by Studio Cherie.  Those of you who know me understand one reason why this gets a vote from me.  HA!!! 

Front with ID holder

I knew from reading about the pattern that it was going to be challenging.  I was in the mood for a challenge....BRING IT ON!  :) 


I decided to make this wallet for my daughter's friend.  My daughter was invited to a birthday party, and I wasn't quite sure what a teenage girl would want.  I hope this will work.  When I asked my daughter if this would be good...she said "uh huh"  like I'm only somewhat paying attention to you mom so I'll just say uh huh.  :)

Overall this is a great pattern.  The instructions are very clear and include lots of helpful pictures.  It is definitely for an experienced sewer.  I don't always read instructions before I start cutting and sewing, but I did for this pattern.  I found that if I didn't quite understand while reading the pattern that it became clearer as I was sewing it. 

My fingers are a little sore.  I did try to follow the instructions while attaching the font/back and insides to the zipper, but it just didn't work for me.  I had to leave the bottom part of the zipper unsewn (where it attaches to the spine) until the end.  I then attached the zipper by using lots and lots of pins, and that is why my fingers are sore.  :)

Front with ID holder
Back with zipper pocket
inside
the spine

Friday, June 21, 2013

Uptown Madison Handbag

For the past several years, I learned to sew bags by following patterns.  I still like to buy patterns to learn new techniques.
The first bag patterns I bought were Amy Butler bag patterns.    I am very glad I got started using her patterns.  The directions are clear and include lots of illustrations.
This bag is from the  Madison Bags pattern.  It includes a shoulder bag version, a handbag, version, and a flower pattern.
Here is the Uptown Handbag.

This bag is made with Amy Butler Fabric.  Such cute stuff!  The flower on this bag is not the one included in the pattern.  The flower is made out of fleece. 
This is a neat bag however, I don't think I've used it once since I made this several years ago.   I've been carrying  bigger bags because I end up carrying my kids' stuff as well.    I like being able to just shove-whatever-in my bag and go.
Enjoy your day!

Tuesday, March 26, 2013

Knot Handle Reversible Tote

I Love this bag.  I love the bright red stripes and polka-dot fabric.  :)  I made this bag for my mother.  She bought the pattern and the fabric.   
The pattern is Knot Handle Reversible Tote from QuiltWoman.com.  I made the straps longer so that it could be a cross body bag.  The fabric is from IKEA. 
This was a very simple and quick bag to put together. 
This is a picture of the inside.  There is a half-circle-esq pocket.  This bag is supposed to be reversible.   

Wednesday, March 20, 2013

Floral Bag- From Bags The Modern Classics

This is the Floral Bag from Bags the Modern Classics book By Sue Kim.  I really love this book.  I also love all the cute patterns on her web site www.ithinksew.com
I decided to make a bow instead of a flower to go on the bag. 
 I added a zipper closure instead of the magnetic snap closure in the pattern.


Monday, March 18, 2013

Lauren Bag

Ahhh, I adore Emma Brennan bag patterns. 
Here is another great one from her Making Vintage Accessories book
This is the Lauren Bag.

Friday, February 1, 2013

Glenda Clutch

This is made with the Glenda Clutch pattern from Bags The Modern Classics by Sue Kim.  She also has a web site filled with great patterns.  IThinkSew 
This was very quick to put together.  I was able to use scraps.  I also added the pink handle.  I cut a piece of fabric 2" by 14".  I fused interfacing to the back.  Then I folded it down the center.  Opened it and folded each long raw edge into the center again.  Then folded and edge stitched down each side.  I attached the handle to the side of the bag. 
I applied interfacing (Pellon 809) to both the front/back pieces and front/back lining pieces.  Also to the front and back of the flap.  I did this because the fabric I used was very thin. 
For the flower, I played with some scraps. 
Here is a pic of the inside.  I added a pocket by cutting another lining piece then folding the raw edge down a few times and sewing across the top.  Then I basted it to the back side of the lining piece.  I sewed down the center to divide the pocket. 
Have a great day!

Thursday, January 3, 2013

Queen of Hearts Handbag

When I see a bag that somewhat resembles a bowling bag style...I get a childhood flash back.  It's a long story but perhaps my Mom and my Auntie N. might remember their bowling bag situation.  :) 
So, despite them, I was intrigued by this pattern.  There are two versions of this bag included in the pattern.  A bowling bag and a handbag (that fits over the shoulder).  I do have to say that my bag didn't really turn out like I thought it would.  I thought the front pleats would be different.  I guess it's a little difficult to tell from just the illustration that is on the pattern.  Queen of Hearts Bowling Bag and Handbag Pattern by Hot Patterns.
I also wasn't too happy with how the instructions have you construct the inside.  So, I changed it up a bit to have my seams on the inside of the bag vs showing on the inside of the bag.  It was tricky and involved some hand sewing.  I probably couldn't explain what I did either. 

The flower was just me playing around with fabric. 
inside

If this is your first time making a bag I strongly suggest that you DO NOT start with any of the Hot Pattern Bag Patterns.    I LOVE the style of almost all of the bags but I've found that many times instructions are left out or unclear.  I still continue to buy the patterns, even though they are on the expensive side, because of the great design.  You'll have to be able to take the pattern pieces and know how to construct the bag  by yourself.  I've spent many hours pulling out hair, near tears, with sores on my fingertips from pin pricks while sewing trying to follow the given instructions.  My seam ripper becomes my best friend/worst enemy.  When I'm finished, the bags are great! I almost always get compliments on the bags I make using a Hot Patterns-Pattern.  :)

Tuesday, December 11, 2012

Go Lightly Crochet Bag

This crocheted bag is a smaller version of this market bag.  The pattern can be found at www.lionbrandyarn.com.  The pattern is Golightly Tote (Pattern # 90136AD).
I was playing around and decided to try something new. I added the orange/white stripe. I don't really love how the stripe turned out...reminds me of the 80's...or so I'm told.  It was fun to play. 
I decided I wanted to crochet a BIG flower for this bag.  I found one in this book.  I, however, had to make a few changes. 

I do love how the flower turned out.
Once again, I used Sugar N' Cram yarn:  light blue for the bag, tangerine for the stripe and flower, and white for the stripe and inside of the flower,  green for the leaves. 
Enjoy your day!

Sunday, November 4, 2012

Lola Goes Shoppin'

This is such a fun pattern.  Have I mentioned that I really love Izzy & Ivy patterns? also see this post.  :)
I always carried small purses, until I had kids.  Now, even though they are older, I guess I'm still the designated "pack mule."  I find it's faster and easier if I  just cram everything I need, as well as the things they hand me while we're out, if I have a bigger bag.  This one does the job perfectly.
The pattern is Lola Goes Shoppin'. This is a good sized bag.  On my bag, I made the bow a little too big...that was my own doing...not the pattern  instructions.  This was also my first encounter with bias binding. 
There is a great zipper pocket on the back of the bag. 
As usual for an Izzy & Ivy pattern, the instructions were clear and easy to understand.  It also includes full sized paper pattern pieces.  I've grown to dislike tissue patterns.

Sunday, September 9, 2012

My Favorite Bag-Kati Cupcake

One of my neighbors is expecting a boy.  So, I decided to make her a diaper bag (hope she likes).  I had a difficult time trying to decide the style of bag to make.  Finally, I chose the My Favorite Bag Pattern by Kati Cupcake.  This bag is PERFECT!  At least I hope she thinks so.  :) 
Before I began I had read reviews on this pattern.  Many had stated that the bag is much bigger than it appears in pictures.  This is true, but I think it will be great to tote around all those baby necessities. 


I used a heavy weight interfacing instead of all the batting, etc. called for in the pattern.   I attached interfacing to the front/back main and front back lining pieces, as well as the front/back pocket and front back pocket lining pieces.  I added a piece of needle point canvas to the bottom but did not add all the extra interfacing. 
I think I'm going to have to make one for myself, when I find the time. 

Tuesday, August 28, 2012

Messenger Bag

It's BACK TO SCHOOL time around here !!!!!  I asked my daughter if she wanted me to make her a school bag.  She chose the pattern and the fabrics.

 The pattern is Butterick B5694 view D.
 
 Sorry....every time I rotate this pic. then try to upload it it turns back on the side. OF COURSE!  ANYWHO, she chose the blue and orange fabrics for the inside because those are her school colors. 
Next time, I think I will change the direction of one of the magnetic snap tabs.  It is awkward the way it closes now. 
This is a pic of the back of the bag.
For the interfacing on this bag I used the really, really stiff sew in pellon interfacing.  I don't know the exact number of Pellon it is. 
For the closure, I used elastic stretchy cord--it was originally from a hoodie that had a draw string bottom.  I have several pieces of this type of cord that was given to me.  So, I'm always trying to think of projects to use it on.  I made an oops and put the button closure on the front of the bag instead of the bag flap.  I don't think anyone will know.  :)  Until now that is. 

Wednesday, March 21, 2012

Boxy Bag

My daughter is taking a sewing class.  She is going to learn to sew.  :)  I think she'll learn more that way.  I took a sewing Home Ec. class in Jr. High.....I hated every minute of it.  Yes, it was a shock to many when, out of the blue, I caught a sewing bug a some years ago. 

I made her this boxy bag to store and carry her sewing supplies. 

I added a handle.  I just cut a 6" x 10" piece of red canvas.  I folded/pressed it in half, then opened it up and pressed both edges into the center.  I edge stitched down both sides.  I pinned it in place 1" on each side of the center of the zipper.  Then stitched the sides. 
For the inside lining I used red rip stop nylon.